All in One View
Content from Introduction to Version Control and GitLab
Last updated on 2026-06-02 | Edit this page
Estimated time: 12 minutes
Overview
Questions
- What is Version Control?
- What is the difference between Git, GitHub, and GitLab?
Objectives
- Understand the utility and benefits of automated version control systems.
- Differentiate between Git, GitHub, and GitLab.
- Explain why GitLab was chosen over other platforms like GitHub.
This lesson is based on Software Carpentry’s Git Novice Lesson and images are reused from that lesson.
We’ll start by exploring how version control can be used to keep track of what one person did and when. Even if you aren’t collaborating with other people, automated version control is much better than this situation:
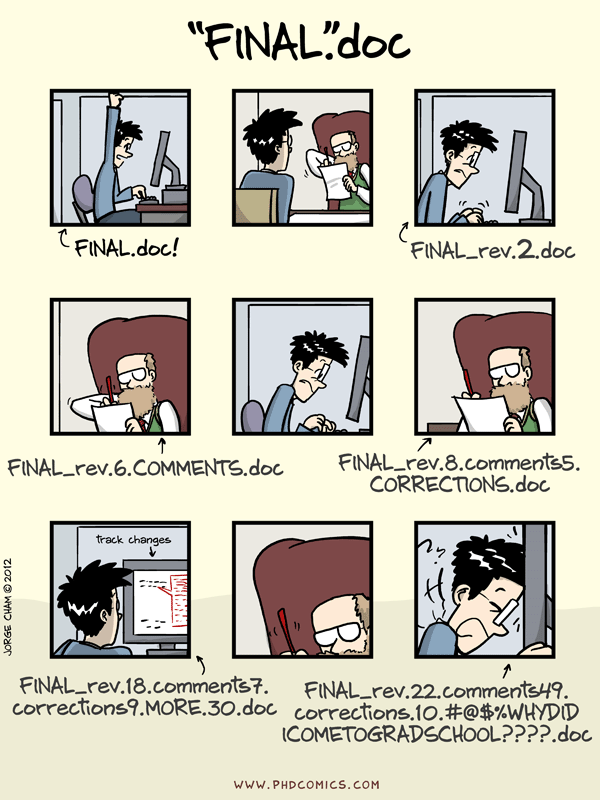
Unfortunately, this might look too familiar to many of us. Even when using software that allows for tracking changes, such as Microsoft Word or LibreOffice, when saving many versions of the same document, it can be difficult to find when a change occured. Google Docs allows for some versioning in the same document, but there is little control over what is saved when, and there is no quick way to see the change history.
Version control systems like Git, GitHub, and GitLab, start with a base version of your document and allow you to record the changes that you have made with descriptive notes. You can think of it as a log of your progress that you control.

With the record of changes, you can also return to different points in the document’s history. In fact, two users can make independent sets of changes on the same document.

Unless multiple users make changes to the same section of the document - a conflict - you can incorporate two sets of changes into the same base document.

A version control system is a tool that allows you to take control of recording the changes to your documents, effectively creating different versions of the same file. It also allows you to decide which changes will be made to the next version (each record of these changes is called a commit), and keeps useful metadata about them. The complete history of commits for a particular project and their metadata make up a repository. Repositories can be kept in sync across different computers, facilitating collaboration among different people.
Paper Writing
Imagine you drafted an excellent paragraph for a paper you are writing, but later ruin it. How would you retrieve the excellent version of your conclusion? Is it even possible?
Imagine you have 5 co-authors. How would you manage the changes and comments they make to your paper? If you use LibreOffice Writer or Microsoft Word, what happens if you accept changes made using the
Track Changesoption? Do you have a history of those changes?
Recovering the excellent version is only possible if you created a copy of the old version of the paper. The danger of losing good versions often leads to the problematic workflow illustrated in the PhD Comics cartoon at the top of this page.
Collaborative writing with traditional word processors is cumbersome. Either every collaborator has to work on a document sequentially (slowing down the process of writing), or you have to send out a version to all collaborators and manually merge their comments into your document. The ‘track changes’ or ‘record changes’ option can highlight changes for you and simplifies merging, but as soon as you accept changes you will lose their history. You will then no longer know who suggested that change, why it was suggested, or when it was merged into the rest of the document. Even online word processors like Google Docs or Microsoft Office Online do not fully resolve these problems.
Version Control Platforms
Today we will explore using the GitLab with RStudio, but how is GitLab different from Git and GitHub?
Git is an open-source tool that tracks your changes. GitHub and GitLab are hosts on the web that collect the complete history of those changes. GitHub offers free and paid plans, and as a member of UW-Madison, you have access to GitLab, which provides additional features such as licensing protections, authentication and identity management through your NetID, and support from DoIT Shared Tools.
Note that GitLab should not be used for storing large amounts of data (over 2GB). UW-Madison Research Data Services provides a Data Storage Finder Tool and consults on best practices for storing research data.
- Version control is like an unlimited ‘undo’.
- Version control also allows many people to work in parallel.
- Git is a version control tool, and GitHub and GitLab are repositories that collect the history of those changes.
- As a member of UW-Madison, you have access to GitLab, which includes additional features.
Content from Using git in RStudio
Last updated on 2026-06-02 | Edit this page
Estimated time: 12 minutes
Overview
Questions
- How do I setup a repository in GitLab?
- How do I use git to record the history of my code in Rstudio?
Objectives
- Identify the location and functionality of Git integration within RStudio
- Create a repository in GitLab for version control
- Clone a GitLab repository as a project in RStudio
- Make changes to the project, add, and commit them using git
Introduction
This lesson will pick up using the ratdat / portal dataset we used in the previous sessions.
To get started we need to setup the project we are going to be working with (both in R/RStudio and in GitLab). You can setup the project first in either place but for this example we will start by creating the repository in GitLab.
Configuring Git on You computer
Each time we save something into our git history, it associates an
email address and a name with it. Before we get started we will need to
configure those using a package called usethis.
First we will install usethis in the console by
typing:
R
install.packages("usethis")
Once it finishes we will configure the user.name and
user.email variables to use.
R
usethis::use_git_config(user.name="Your Name", user.email="your.email@example.com")
Finally, you can check your configuration
R
usethis::git_sitrep()
Setting up the GitLab Project
- Go to UW-Madison GitLab instance and login
- Create new project called
ratdat_lib_wksp, private repo with README,
First you need to navigate to the UW-Madison GitLab instance and select the UW-Madison NetID login option.
Next we will create a new project. You can do so by clicking the “+” button then “New project/repository” option in the upper-left hand of the screen OR you can click the blue “New Project” button on the right hand side of the screen. If you do not see the “+” button, it might mean that your sidebar is hidden. To see the sidebar, click the sidebar icon at the top left of your screen.
On the “Create new project” page, choose “Create blank project”.
We will call our project, ratdat_lib_wksp. Note, if you
belong to any organizations (like from your dept or lab), you may need
to change the project URL to your user instead of the organization. It
will automatically assign the “Project slug” (aka the end of the url for
that project) to be the same as the project name. If you use spaces in
your project name, it will replace them with - in your
project slug. You also need to choose the visiability level. You will
want to think carefully about what visiability level makes sense for
your projects in the future. Things to consider include if you want to
share it with your lab/team members, others at UW, or make it public for
anyone to see/use which can be helpful if you need it to be public for
publication. Working in open source, you typically will make a project
open unless there is a good reason to keep it private. You can change
this setting later if you decide to do so. For this project, we will all
make the repository private. For learning purposes,
this will help us all be required to authenticate with GitLab at the
same time. When a repo is public, it doesn’t require you to authenticate
when you put it on your computer from GitLab but it will require
authentication when you want to sync changes you made on your computer
to GitLab. You can decide if you would like it to create a README for
your project when you set up future projects. Best practice is to have a
README for any project so we will keep it checked for this practice
example. We will skip the option for security testing but this could be
an option you want to enable for your code projects. Then click the
“Create project” button.
Now that we have created the project we can see the repository. It created a nice README template at the bottom.
You may want to give a short orentation to the different parts of the GitLab project webpage that seem relevant here: For example: - the file list - issues/merge requests on the left pane - project info on the right side (license, changelog etc)
Setting up the Project in RStudio
- Create GitLab PAT
- Click settings in repo
- Project access token page
- Add new token -
work laptopname or whatever you’d like, description blankdefault expiry, owner role, leave scopes unchecked - Create project access token
- Copy project access token to text file
- Setup project
- Return to main repo page
- clone using https
- Switch to RStudio
- New Rproject, version control with Git, paste URL, save on Desktop
- Authenticate with username and PAT (from text file)
- Show the project in R and describe the new files R added
Next we will clone (copy) this project to our computer
and make it a project in RStudio. Before we can do so we need to set up
verifying our identity with GitLab.
GitLab Authentication
We need to set up a special passkey called a Peronal Authenticalion Token (PAT) on GitLab and then we will enter it in RStudio when we need to connect to GitLab.
We need to note both our GitLab username and your PAT so we can use
them when we set up the Project on our computer. In GitLab you can check
your username by clicking on your profile icon in the upper left panel.
It will say @FIRSTNAME.LASTNAME or your
@NetID, or something to that effect. Note down your
username in a text file so you have it available when you need it
later.
To setup the PAT, click the “Settings” option on the left hand side (bottom of the left pane), then choose “Access Tokens”.
On the “Project access tokens” page, click the “Add new token” button. Give the token a name specific to the computer you are working from. You can leave the Token description blank. By default, it will expire in a month. We will leave that setting for now and if you use GitLab after a month, you should go back and give it further permissions or create a new token. Select “Owner” as the role. You can leave all the options under “Select Scopes” unchecked, these would be needed if you were setting fine-grained permissions for your token. Then click “Create project access token”.
It will then show the project token in a green box on the screen but we won’t be able to access it again so we need to copy it now (we can always setup others if needed later). Click the copy button to copy the token. Copy this into a text file.
Now that we have set up the authentication, we can create the Project
on our computer and setup the connection to GitLab, at the same time. In
GitLab, return to your new project directory
ratdat_lib_wksp by clicking the link at the top of the
page. Then click the blue “Code” button at the top of the directory
information. Then click the copy button to the right of the “Clone with
HTTPS” option.
Switch back to RStudio and create a new project with the +shield icon
or File > New Project.
In the new project wizard, click the “Version Control” option. On the
next page, click the “Git” option. Paste the HTTPS address you copied in
the “Repository URL” option. It will autofill in the “Project directory
name” box with the slug from the URL when you click away from that box,
but you can change it if you ever need to (which you will later). You
may want to change where the project is created in your file system, by
default it will likely save it in your home folder/~. We
will change ours to Desktop so we can find it more easily by clicking
the “Browse” button, and then choseing our Desktop folder
and clicking “Open”. We can then click the “Create project” button.
Since we’ve never authenticated with GitLab before it will ask us for our username. Type or paste your username and token from the text file into the the username and password boxes respectively.
Now you are in the project for the GitLab Project you set up. You
will see the project name in the upper right-hand side of the page. The
file pane in the lower right quadrant of RStudio will also show the… -
.gitignore - a file that allows you to have untracked files
in the folder on you computer that in the project folder - this was
created when we setup the Rproject so git doesn’t try to tack some R
files that commonly are not tracked with git -
ratdat_lib_wksp.Rproj - the Rproject folder (this is nice
for reopening your project from the file folder) - this was created when
we set up the Rproject since it didn’t already exist -
README.md - The documentation file that GitLab created for
us when we set up the project
Tracking files with git and RStudio
Let’s go check out the “Git” file pane in the upper right quadrant!
It wasn’t there until we cloned this git repository/project. It
currently lists the two files that were created when we set up the
project, ratdat_lib_wksp.Rproj and .gitignore.
This is because these are new files that have not been tracked with git
before.
To track these files in our repository we have to do two steps, first we stage the files and then we commit them to the history of the project/repo. To stage the files in Rstudio, we can click the checkboxes in the “Staged” column of the Git pane. When we do this, the status of each file changes from “? ?” to “A” for “Added to the stage”. Then to commit them, we can click the “Commit pending changes” icon in the Git pane.
This pops up a window to “Review Changes” where we can click through the files and see what has changed. Since both these files are new, they show a big green section of lines in the files. This is called the “diff” it shows the difference before and after the commit. In this case, all new lines were added and are in green. We could also unstage/reset the files if we decide we don’t want to commit them both at the same time (typically you will commit linked changes together but can commit unlinked changes separately).
To commit these changes we also have to write a message about what has changed in this commit in the “Commit message” box. We will type, “Adding Rproj and gitignore files” and then we can click “Commit”
A git commit window will pop up and have a message that includes a unique identifier code for the commit (called a hash), our commit message, and a summary of what changed in that commit. We can then click “close” on the window. We can also close the “Review Changes” window. Now all the files in our project have been tracked with git. We can tell by looking at the “Git pane” because there are not files listed. This means there are no new files and no new changes to existing files in our project since we last committed it.
Create an R script
Let’s practice adding new files and tracking them with git.
Create and Rscript with the following code and then track it with git using the steps we learned.
- Copy the code above
- Create a new Rscript file
- Paste the code into the Rscript
- Run your R code. Make sure it works before we commit it.
- Add the file by clicking the staged checkbox in the Git pane
- Click the commit button in the Git pane
- Add a commit message and click “Commit”
Now that we have created the file, we notice that our plot looks a
bit odd, we need to tell it the groups are the species id’s and should
be separate lines. We can color the lines differently at the same time
by adding color = species_id to our aes()
function Let’s do so and then save that new version of the file to
git.
The code should now be
R
library(ratdat)
library(tidyverse)

yearly_counts <- complete_old %>%
  count(year, species_id)

ggplot(yearly_counts,
       aes(x = year, y = n,
           color = species_id)) +
       geom_line()
Now that we’ve made this change, we can commit this new version. Like new files, modified files show up in the Git pane. Notice this time the status is “M” for modified instead of “? ?” like it was for a new file. We can still stage it and commit it just as we did with the new file by clicking the checkbox to stage it, clicking commit, then adding a commit message. Note, before you commit that the Review Changes window how shows red for the previous lines in our code and green for the new lines in our code. Also the number lines for the removed lines are in the first column and the numbers for the new lines are in the second column.
Exploring the history of our file changes
The Git pane has several other features for working with git in RStudio, the other one we will point out is the history part of the “Review Changes” window. To open it directly you can click the click icon on the Git pane menu. You can access it by clicking the “History” toggle in the Review Changes window, when it is already open. The history pane now shows the “timeline” of commits we’ve added so far, authorship info, and we can click through them to see the diffs for each one.
Time to push it!
Finally we can sync these changes with GitLab. Everything, besides the original setup, we have done so far has been on our local computer. If we reload the GitLab project, nothing has changed. The commits we made aren’t there, nor is the script we created. To get our changes to GitLab we have to “push” them. In the git pane, we can click the green up arrow. This will then pop up a status as it transfers the changes.
Now in GitLab we can reload the page and we can see the script and
our most recent changes.
In GitLab, try exploring the files by clicking on them. You can also see
the commits and their diffs by clicking on the “X commits” (where X is
the number of commits you’ve made) link in the right hand “Project
Information” menu or by clicking “Code” and “Commits” buttons on the
left hand GitLab menu.
We’ve now learned the basis of working with git and GitLab in Rstudio. The setup steps will only need be done once per repository or computer. The snapshot steps of checking the box (adding a file to stage) and commiting will be done each time you create or modify a file (script). The syncying step(s) of pushing (and pulling which we will see in the next section) will be done at least when you come to a stopping point (or starting point for pushing).
Content from Syncing your project with GitLab
Last updated on 2026-06-02 | Edit this page
Estimated time: 12 minutes
Overview
Questions
- How do you keep your project synced using GitLab?
- Why should you consider using UW-Madison instance of GitLab?
Objectives
- Simulate how to pull and push between two different “computers”.
- Discuss what are the advantages of using UW-Madison Gitlab instance vs Github.
Pushing and pulling between two computers
Let’s pretend for a minute that you have a computer at home and one at work. It would be nice if your work is kept synced between the two locations. Git + GitLab can help with this.
We are going to simulate the two computers situations by creating a copy of your project in a different location on the computer your are working on.
The key dynamic we want to follow is push and pull.
- After completing a task, push to the remote repo; that way your work is saved to GitLab.
- When you got to your second device, pull; your saved work is pulled from the remote repo into your “work device”.
Creating a copy of the code on a “new work computer”
To create a copy of the project on your “work computer”, we are going to practice cloning a project from GitLab
- Go to your repo on GitLab and grab the
Clone with HTTPSurl from theCodebutton. - On RStudio, go to
File>New Project. This will open a popup window. Pick theVersion Controloption. PickGitand clickNext. - The next window gives you a place to paste the url you got from
GitLab and the location on your computer to create the project. Navigate
to your
Documentsfolder and name the projectwork-computer-ratdat. - Click
Create Project. Git will make a copy of your project in this new location. Now you have two computers to practice pushing and pulling from each other!
You many now have up two copies of the same project. You can tell which one is meant to represent which computer by looking at the project name in the upper right hand corner. The original “Desktop” project is called “ratdat_lib_wksp”, where the 2nd computer is called “work-computer-ratdat”. If we were really working on them on separate computers, we would probably have kept them both with the same name, but to illlustrate the different computers and practice syncying between them, we used the option to change the name when cloning it.
Syncing code between the two computers using GitLab
Let’s practice swtiching between our two computers.
While we are on our work computer we come up with a great idea for our plot, we should make this plot only with the more abundant species. First, make sure you are in the “work-computer-ratdat” project.
Filter Yearly Counts data to only Abundant Species
Edit your code to create an abundant species table, where the average
species count across years is greater than 50, and then filter your
yearly_counts data to only those species before
plotting.
R
library(ratdat)
library(tidyverse)

yearly_counts <- complete_old %>%
  count(year, species_id)

# only plot species with an average count above 50
abund_species <- yearly_counts %>%
  group_by(species_id) %>%
  summarize(avg_ct = mean(n)) %>%
  filter(avg_ct > 50)

yearly_counts %>%
  filter(species_id %in% abund_species$species_id) %>%
  ggplot(aes(x = year, y = n,
             color = species_id)) +
    geom_line()+
    geom_point()
Challenge
Stage and commit the changes we just made in the “work-computer-ratdat” project.
Note, since we haven’t push these changes to GitLab it still has the old version of our script. Push the changes to GitLab and see that those changes were synched.
The next day, you are working from home and want to get the lastest
version of your code to work on. Switch back to the “ratdat_lib_wksp”
Project. Notice that the code in the script is still the old code. It
does not automatically sync. Use the blue down arrow to
pull down changes from GitLab before starting work for that
day. Note, don’t click the dropbox arrow as that does a special type of
pull that we don’t need for this workflow.
Summary
This git workflow allows you to keep repos synced between two computers. Best practice is to always push your changes when you are done working and to always pull the lastest version when you start. Sometimes things will fall out of sync because you forgot to push or pull. Those changes can be merged together in different ways and sometimes you have to resolve a conflict if you’ve changed the same line in two separate git histories. When you start using more complex git workflows or collaboration, this will also add some complexity.
How does this worklow affects you?
- Does your usual workflow requires using two computers?
- Do you see yourself using this workflow on a daily basis?
- What challenges do you anticipate?
Why you might choose to use GitLab or GitHub (over the other)
GitLab
- You might want to have your project associated with UW-Madison, for
publication purposes, for example.
- For advanced users, you might want to take advantage of integrations with resources. Being on campus IP space and using AD for authentication facilitates that process.
- GitLab code base is open source, which means you can modify and extend it to suit your needs. That is why UW-Madison GitLab instance is hosted and maintained at UW-Madison.